September 29, 2002

Spring Jewel Mosaic Picture Frame

  6/9/2010:  This entry was downloaded from my Art Diary on the Bellsouth Personal Web Pages.    After completing, this picture frame was tucked away until 9/2008.  When Lilly was born, I put a picture of her and her momma in it and presented it to Nikki.    She keeps it on her bookcase.


Event Times
Tuesday, September 3, 2002


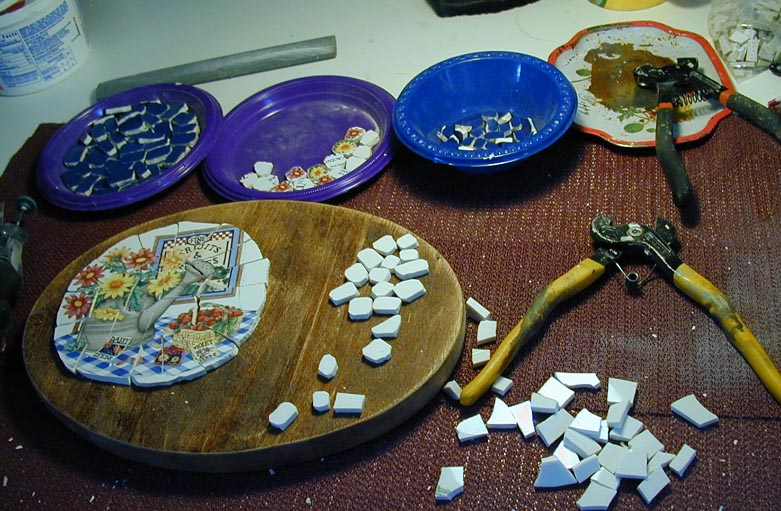
Selected next project .... a small picture frame that was picked up at a yard sale two weekends ago. (Need something small after spending so much time on the entry table).

Removed glass, picture & backing from frame. Sanded lightly with hand sander. Selected glass, a couple pairs of contrasting earrings and some bangle type thingies.

Painted back and side edges with three coats of gold acrylic paint. As glass selected is already cut, will begin process of nipping and deburring.

Event Times
Wednesday, September 4, 2002


Finished nipping/deburring. Started applying tesserae and jewelry to picture frame.  

Finished applying Tessarae to frame. Set aside to dry for several hours, and then cleaned with a damp cloth. (Usually lay a damp cloth over piece and allow moisture to loosen any mastic, then wipe off gently with a cloth. You have to be careful as it takes a couple days for mastic to firmly dry.

 Signed piece as 'Spring Jewel' (primary name of china used), signed and dated.

Applied three coats of PolyAcrylic to back and outside/inside edges.

Hold for next grouting session.


Event Times
Saturday, September 28, 2002


Grouting picture frame.
a) Mixed small amount of white grout (on dry side) in mardis gras cup. Added small amount of lavender paint to tint grout. Mixed well.
b) Applied grout to mirror frame with hands; pushing between spaces and around edges of jewelry and beads.
c) Remove grout with small sponge, rinsing sponge between each swipe of the frame. Goal is to remove grout from tops of glass and jewels, but not from between cracks.
d) Keep working at removing grout until everything clean. Having jewelry on a piece always makes grouting more difficult. Invariably, grout gets into little spaces on the jewels and is quite difficult to get out. (This typically comes down to coaxing out with a toothpick).

Will set aside for a hour or two and then buff a couple times to remove any haze that develops on the glass.

This piece is named Spring Jewel. Tomorrow, or Monday if we go to the Wooden Boat Festival, I'll seal and then we can put together and finish.


Event Times
Sunday, September 29, 2002


Applied two heavy coats of "Impregnator", a sealer, to the picture frame. Waited 10 minutes, then wiped excess liquid from glass so it does not form liquid spots.

This piece is named Spring Jewel (after the primary glass used). It will be posted in the 'not for sale' section of the Mosaic Gallery. This piece will be a gift.
  

Rose Mosaic Water Pitcher; Work in Progress

6/11/2010:   The details of this project are uploaded from my Bellsouth Personal Web Pages.  After completion of this project, the vase was packed into a box and put into a closet for consideration, where it stayed (along with alot of other items), for about 7 years.   Several months back, I decided it was time to start going through these items.   This particular pitcher vase is listed for sale in my Artfire shop under Shabby Chic Rose Floral Pitcher. 

 Water Pitcher
Saturday, September 7, 2002
 Selected saucers, beads, watch and ceramic flowers to adorn the green water pitcher (vase.

It's interesting that just about everything here was found at today's yard sales. That seldom happens, however, when I had it all laid out on the table to take a look, realized it. So, this one just has to be a go. 


Water Pitcher
Sunday, September 8, 2002
Took right about three hours ... here's everything all chipped, nipped,deburred and ready to roll !!! 
Have a little extra time today (Beau's wrapped up in the Saint's football game), so went ahead and started applying the tessarae. 

Water Pitcher
Monday, September 9, 2002
Continued applying tessarae to the water pitcher. Now almost 1/2 done. 

Water Pitcher
Wednesday, September 11, 2002

Finished applying tessarae to water pitcher. Will set aside for a couple of days to allow mastic to thoroughly dry and then will clean and hold for grouting.

Water Pitcher
Saturday, September 28, 2002
Okay, this is the last item to grout for September project. Horay!!

a) Mixed approx. 1 cup of white grout in a mardis gras cup (because they are disposable).
b) Applied to water pitcher with hands, pushing grout between crevices in glass, gems and jewels. Note that by the time I am finished with applying grout to entire pitcher, the grout is already mostly dry.
d) With 'barely' damp sponge, brushed dry grout from top of glass.
e) Continued removing grout in layers until water pither is clean.

I did not like the way the beads at the top of the vase looked when grout was applied .... so, pulled them off and cleaned rim.

Will let sit until after dinner, then will buff with soft clean cloth to remove any haze build up.


Water Pitcher
Sunday, September 29, 2002
 Applied two heavy coats of Impregnator (stainl sealer) to the water pitcher to seal grout. Waited approx. 10 minutes and wiped off any remaining liquid from the glass and gems. (Impregnator is a clear liquid, like water, but with a tremendous smell. If left on the glass to completely dry, it will leave tremendous water spots).

This project is completed. Sometime in the next day, I'll come up with a name for her (usually this happens well before now) and take pictures. 

September 28, 2002

Provence China : Mosaic Entry Way Table

6/3/2010 :  This piece is uploaded from my Art Diary maintained on the Bell South Personal Web pages between 2002 and 2006.   I never offered this table for sale.   I ended up using in it my front entry for a couple years, and now it's on a back wall.    I actually no longer want it, just haven't been motivated yet to move it out to a new home.

*************************************************************************************


August 20, 2002

Selected table for next 'inside' project. Table purchased several weeks ago at a yard sale. It has a shelf that sits underneath main table that will be repaired.

Beau (being the great sport that he is), took table apart and sanded for me. 


August 21, 2002

Started breaking dishes for mosaic on entry table. Selected set of dishes named 'Provence' from previous yardsale. Set consists of 8 plates; 8 saucers; 7 bowls and 8 coffee cups.

Glass is being broken with tile cutters, versus breaking with hammer, to maintain control of keeping pattern and finished tile size under control.

It took approx. 3 1/2 hours to cut the glass to desired sizes. 


August 22, 2002
Selected a shade of green for table legs, sides and bottoms. Painted two on an surfaces not to receive mosaic, spaced several hours apart.

 August 23, 2002
Continued process glass. Started nipping the corners off all of the pieces of cut 'glass' tile. This will give a uniformity of appearance and remove the sharp corners. Due to amount of glass involved, this will take 4 - 5 hours.

August 24, 2002
Apply 2 coats high gloss varnish to all painted (non-mosaic) surfaces. This step will be completed over several days ... it takes about 8 hours for each coat to dry ... legs are painted seperately on each side.

Note that Varnish is much more difficult and time consuming (not to mention the smell) than poly acrylic, but the result (in my opinion) just can't be beat.


August 26, 2002
Scored table with box knife and started mosaic on bottom shelf. Mosaic being applied to table with tile mastic.
 August 28, 2002
Finished second shelf to the Entry Table. Set aside to dry.

August 29, 2002
Mosaic to table top in progress. Deciding whether to process coffee cups for side panels, use existing "left-over" glass from top, or paint. 

August 30, 2002
Pulled the 7 coffee cups that match the plate set from inventory. Cut cuts down to maintain pattern. Unfortunately, this glass was rather fragile and I was not able to save the handles. 

August 31, 2002
Applied coffee cup pieces to edges of entry table. Each piece is trimmed with nippers and deburred with a hand file at point of application. The tessarae is applied with mastic, as was the top.

After application complete, table will be set aside overnight, then thoroughly cleaned to remove any mastic on tile. Table will then rest at least a week, before grouting. 


September 27, 2002
a) Mixed grout. Started with plain white and tinted with small amount of acrylic paint (same color as legs), in an old butter container.
b) Applied grout to table (top & sides, as well as bottom shelf), pressing between cracks and crevices with hands until complete.
c) Scrapped top of table with plastic butter knife to pull off excess grout on top of glass shards (easier to wiping it all off with the sponge).
d) Removed remaining grout with damp sponge, rinsing sponge after each wipe.
e) Allowed table tops to dry for about an hour, then buffed glass shards with soft clean/dry cloth to remove built up haze from grout.


 September 28, 2002
Applied two heavy coats of Impregnator, a stain and water sealer to table tops and sides to protect finish. Allowed sealer to soak in for ten minutes, then wiped remaining liquid from tops of glass. (Let this stuff dry on the glass and it's pretty tough to get off).

Later tonight the glass on the tables will be cleaned with vinegar and buffed to bring to ultimate shine. Tomorrow, or Monday, I'll attach the legs and photograph.

This piece is named Provence and will be made available for sale in the Mosaic Gallery.


September 27, 2002

Spring Garden Step Stool; Work in Progress

06/11/2010:  This Work in Progress to Completed project was carried over from my Bellsouth Art Diary, Personal Web Pages.

Spring Garden Stool
Thursday, September 12, 2002

I've had this stool sitting around for months awaiting it's turn. Okay, here we go; this is the next indoor project.

Removed legs (they slide, then are glued in place) and sanded stool and legs.

Selected a flower garden picture cut from a plate, and some blue and white glass from 'already cut' inventory.  


Spring Garden Stool
Friday, September 13, 2002
Cut blue plate glass to 1 1/4" pieces to fit side edges of stool.
Cut small blue pieces to form edge/border on top of stool.
Cut white pieces to smaller sizes.
Cut solid circle plate pattern into manageable pieces.
Nipped edges of everything but plate picture (Nipping might distort the design).


Spring Garden Stool
Saturday, September 14, 2002

Using mastic to apply china to stool. Applied blue border around the edges and centered/applied floral piece in the center. Quit for lunch with the boys (before LSU).


Spring Garden Stool
Saturday, September 14, 2002
Complete applying china (with mastic) to the stool. (Individually buttered each piece).

Amazing that I finished this project with only 13 pieces left over. When I prepare china for a piece, I always make a guess at how much of each I think I'll need. This is the closest I've ever come. 


Spring Garden Stool
Sunday, September 15, 2002
Cleaned china with clean cloth dipped in vinegar to remove any stray mastic. Applied two coats of bright blue paint to bottom of legs of stool. (Coats about 1 hour apart; legs painted in sections.
Before bed, applied a coat of clear gloss varnish. When dry, will set aside for grouting at end of month.  


Spring Garden Stool
Thursday, September 26, 2002
a) Mixed small amount of white grout (in same cup as used in Azalea Pot; just finished grouting).
b) Applied grout to stool using hands to press into spaces between glass shards on tops and sides.
c) Carefully applied additional grout to fill in gap between sides and tops, to develop a uniform appearance.
d) With damp sponge, lightly wiped grout from glass (tops & sides). You have to be careful in this step to ensure you do not pull the grout back out of the crevices.
e) When completed, set stool aside for about a half hour, then returned to light buff the glass and remove the built-up haze from the grout. 


Spring Garden Stool
Friday, September 27, 2002
Applied Sealer "Impregnator" with a small artist brush to tops and sides of stool. Applied in two heavy coats, allowing sealer to soak into grout.
b) Waited 10 minutes, then wiped off residue from liquid sealer from tops of glass.

This is 'almost' the end of the Spring Garden Stool Project. I'll let this one air for a couple of days (Sealer has quite an odor ... best to let the odor go away prior to boxing up and putting away), then I'll put on the legs and take pictures for the mosaic gallery. 

Mosaic Azalea Pot; Step by Step

 This entry was brought from my Bellsouth Personal Web Page Diary.  I created this piece between September 5 and September 27th.   I made this pot for myself and it still resides in my backyard. 
 
Azalea Pot 
Thursday, September 5, 2002

Selected next project - an Azalea Pot. The pot and bowls were picked up at a garage sale a couple weeks ago. The pot has never been used.

Selected pot, three flowered bowls and a handful, or so, of green glass gems to complete the project.


Azalea Pot
Friday, September 6, 2002
Cut two bowls being careful to maintain circular flower pattern. Measured cut glass with pot to determine amount needed to make a complete circle. Cut remaining glass, and third bowl in medium size pieces. Nipped edges and deburred glass. It is not ready to go.

Azalea Pot
Saturday, September 7, 2002  
Mixed a small amount of thin set morter and used to apply glass tessarae and green gems to the azalea pot. Set aside for several hours, and then the glass will be cleaned with a damp cloth.

This lovely pot will have to cure outside for a few days (prior to grouting); it still reaks of sealant.


 Azalea Pot
Thursday, September 26, 2002
Grouting of Azalea Pot.

a) Mixed small amount of white polyblend grout in a cup.
b) Applied to Azalea Pot using hands and pallet knife, pushing firmly into spaces between glass shards and gems. Covered entire pot.
c) With damp sponge, wiped grout from tops of glass shards and gems, until mostly clean (a slight haze remains; this is typical).
d) Buffed glass and gems with soft cloth to remove haze from dried grout. This step takes places 30 or more minutes after completing the grouting.


Azalea Pot
Friday, September 27, 2002
Sealing :
a) Poured small amount of "Impregnator" (A sealing product) in a cup.
b) Put pot on small piece of styrofoam (to protect ledge under pot).
c) Applied "Impregnator" with a small brush. Applied two heavy coats, allowing the product to soak into the grout.
d) Waited 10 minutes and then buffed glass and gems with a clean soft cloth. (If you allow most sealers to stay on the glass, it will form 'water spot' type deposits that are harder than 'heck' to get off.

This is the end of the Azalea Pot creation. This pot will be maintained for personal use in my yard.

September 23, 2002

Concrete Plant Stand using a Tomatoe Cage

6//2010 :  Uploaded this entry from my Bellsouth Personal Art Diary.     This plant stand is still quite functional, albeit ugly, out in the yard.   I told Beau he could get rid of it if he wanted, but it appears he still finds it a great plant stand. 


August 21, 2002
Created base for Bowling Ball stand. 
Took 1 tomatoe form and cut off spike ends.
Measured for, and cut, three sections of 1/4" styrofoam.
Tapped the styrofoam to outsides of tomatoe stake using duct tape.
Cut stucco mesh and wrapped (in sections) around the styrofoam form.
Tied the individual pieces of stucco mesh together with small wire to ensure it lays flat against the styrofoam.


August 22, 2002
Made concrete 'dry' mix in bucket (3 parts sand; 3 parts grout; 2 parts cement).
Mixed small batches of concrete (2 garden scoops at a time ... have an approx. 20 minute window to work with damp concrete).
Made small patties with hamburger and pressed through stucco mesh ... covered untire base.
Applied a second layer of 'patty' concrete to even out the valleys.
Smoothed sides with hands and spoon.
Pressed in 1" pieces of mirror tiles, green glass gems and aquarium gravel for decoration.
Covered with plastic and left overnight. (Note: Misted with a spray bottle half dozen times to keep moist). 


Whole process took about 4 hours.

August 23, 2003

Unwrapped plant stand. Two glass gems and fallen off; reapplied with thin set morter.

Cleaned glass gems and mirror tiles with warm water. Used rasp to smooth edges at bottom. Used a butter knife to pull out the styrofoam from inside.

Took outside, sprayed thoroughly with a hose and rewrapped in plastic. Set in corner of yard to cure of several weeks.


September 17, 2002

Yard Sale Saturday, 9-17-2002

 (Uploaded from Art Diary on Bellsouth Personal Web Pages)

Yard Sale Saturday. Today seemed to be dishes day. Found three different 'incomplete' sets of dishes. Some great color here ....

Also found a new pot, an old picture frame dying for a makeover and a funky cow. Added a pair of Rinestone earrings. Also found the Cat Earrings, however, these will be given to a good friend who adores anything cats. Also found (not pictured) a small water fountain, in working condition. Purchased to have onhand the internal water parts.

Just because the findings was so good today, made a quick dash by Bombay; and walaa .. found 4 large pieces of Sytrofoam; perfect molds for some upcoming Sun/Stars project.

And ... to top it all off; Rodney at the Winn Dixie had saved several tubes from meat department paper rolls for me ... potentially another mushroom, and perhaps a 1st birdbath. (Just not enough hours in a day !!!).

What a great YardSale Saturday. (It didn't even rain!!)


September 16, 2002

Cut Glass

 Cut Glass
Monday, September 16, 2002

 Each week I drag home more and more dishes from yard sales. Which mean, I periodically run out of room to store these dishes ...... So, have to call a "breaking glass" day.

Dishes are brought in from the garage storage shelves (when you do mosaics, you have things stored in every imaginable corner), broke with cutters and sorted into plastic ziplock bags. They are then put back into storage containers by color for use in future projects. I usually max out on this at 4-5 hours, as even with gloves, I get blisters on my hands.

September 14, 2002

Yard Sale Saturday, 9-14-2002

6/13/2002:  Transferred from my Bellsouth Personal Web Pages, Art Diary


Yard Sale Saturday
  Saturday, September 14, 2002
It's raining again. Tropical Storm Hanna is out there in the gulf; but garage sales go on !!!
No great finds today, but did come across various things I'll be able to use.
For example ... some odds and ends of costume jewelry (a whole pack for 50 cents), 2 place settings of a black patterned china, a china pocket thing that I bought to break the flower from, an old tack hammer and rasp (a girl never has too many tools); some wire, craft sticks and bowls for concrete molds.
Oh yeah .. best find was the glass door knobs. These will probably find there way into concrete some day. Overall, not bad. (But, if I keep dragging glass home, I've got to get going and break it up soon. I'm running out of room around here).

September 10, 2002

Concrete Molded Ship Plaque - Tutorial of sorts

6/12/2010:  Transferred this project from my BellSouth Art Diary.      After this piece cured, I hung it on the back fence.   As it is quite thin I wanted to see how well it would hold up.   Well, other than moving it into the shed several times for hurricanes, it held up perfectly well and is still on the fence. 

Concrete Ship Plaque
Monday, September 9, 2002
Found this exceptionally ugly gold (thin) metal tray last weekend for a whole buck. Had to have it (although if I'd waited and come back later, it would have been in the garbage I sure)!

Here's the experiment ... to what extent will the concrete pick up the detail ..., and then if it turns out, just what am I going to do with it?

Thoroughly lathered the face of this puppy down down with vaseline. Prepared up a bunch of dry concrete mix (6 cups sifted sand, 6 cups tan grout, 1 1/2 cups grey Portland Cement).
Cut a circle and various small pieces of stucco mesh, as well as some drywall cloth to use as reinforcement. 


Mixed dry concrete (1 cup at a time), with small amount of water and firmly pressed into entire metal mode. Layed in the stucco mesh (attached a hanging wire through the stucco), and drywall cloth over top of 1st layer of concrete.
Topped off by pressing in another layer of concrete over the mesh reinformements.
Smoothed, dated and carried outside to drying tables.  

 Here's she is .... curing away. Wrapped her up in plastic and will unmold her tomorrow morning. That is, of course, assuming the vaseline was enough to make it come out of the mold. While creating this, I kept thinking I should be using motor oil, but hate the messy residue.


Concrete Ship Plaque
Tuesday, September 10, 2002


 Turned mold upside down on top of peice of styrofoam and gentle pulled mold away from concrete (holding breath, of course). It came out easily; the vaseline was effective.

Lightly rasped the edges, and placed piece inside a plastic garbage bag. Sprayed with water, closed up bag and moved to backyard holding/curing area.

I'll spray daily and leave alone for a couple weeks.

Note: picture does not show it, but detail is quite good. Will probably try some paint or other technique to bring out patterns after at least 1 month of curing.

September 07, 2002

Yard Sale Saturday, 9-07-2002

Yard Sale Saturday
 Saturday, September 7, 2002

 Today, it did an excellent job raining! I figured yard sales would be cancelled, but no ... they were out there.

Found several great items to work with ... a great green water pitcher and some saucers that I'll start this week. The blue and white dishes will probably be set aside for an upcoming bird bath. And .... that great (UGLY) gold plastic dish in the very back is going to be an upcoming concrete experiment ..... if it'll stop raining !!

September 03, 2002

Christmas Vase, Mosiac Plate, Glass on Glass

(06/03/2010)  This piece is uploaded from an Art Diary that I maintained on the Bellsouth Personal Web Pages between 2002 and 2006.    After I finished this vase, it was packed up in a box and stored away in a closet (as was many of my projects).   I pulled it out last year and listed it in my Artfire Shop under the title of Christmas Vase. 


Sunday, August 18, 2002
Pulled from inventory glass that had come from the border of some Christmas Dishes (Holly & Poinsetta's). Also selected some green & red prism pieces. Pulled out a small sheet of mirror, that is being cut down to 1/4" squares. After cut, the mirror pieces will be deburred;


 Monday, August 19, 2002
Drew in lines for stripe effect and applies rows of 1/4" mirror tiles. (dry 30 minutes after each row as piece has to lay down while working; so applied pieces do not move around).
Applied a section of red and a section of green glass to vase. Set aside to dry overnight. Note: Changed my mind about using red & green prism pieces. Decided to leave this simple. It is my impression that Christmas is much too overdressed already.
Tuesday, August 20, 2002
Completed mosaic on vase -- another stripped section of green and another of red. Ran out of prepared red glass and had to stop and nap and debur enough to finished project.

Set aside to dry for several hours, then cleaned mastic off mosaic pieces using vinegar. Will let dry for several days before grouting/sealing. (You may have noticed that grouting is obviously not my favorite part).
Monday, September 2, 2002
Mixed small batch of white polyblend grout. Applied grout to Christmas vase with hands. Allowed to sit about 10 minutes and sponged off. Set aside 2 hours, then proceeded with polishing haze from glass.
Tuesday, September 3, 2002
Applied a sealant coat to 1st Mushroom, Christmas Vase and Three Forty Vase. The sealant is "Impregnator" and protects from stain. Sealant is a clear liquid and is applied with small artist paint brush. The liquid absorbs into the grout. After 10 minutes absorbtion, any remaining liquid is wiped off the glass with a soft cloth. (If left on, this will form spots that take quite abit of elbow grease to remove).

Finally .... these three are finished !!!