August 14, 2006

Book Pages

Book13 These book pages are becoming all time-consuming. I find that I'm out in the studio playing with them every time I get the opportunity. Housework is not happening; I felt hostile about having to grocery shop .. I just want to paint.
I continue to work on the book pages. I enjoy the spray paint. I keep adding new colors .. I've a good 12 cans going now. I like to have two books open at the same time to receive the spray paint. One book with spray over stencil, then pull the stencil off and lay the excess paint face down on the second book. Wonderful smudges.
These pages are going to be ongoing for quite some time. I've found I'm happiest with them between 6 - 10 layers. That number times the 4 books in progress ... well, quite awhile.
I found myself thinking this afternoon that I'm getting quite comfortable here and that I might be ready to move on to a larger surface.

October 25, 2002

Concrete Mirror 01 - Tutorial

 6/13/2002 :  Transferred this entry from my Bellsouth Calender.    I hung this piece on the back fence with the idea that I'd evaluate the mirror haze situation as it went along.   The haze did clear within a week or so, however, within a year the cement started deteriorating the silver backing on the mirror.    It remains on the back fence. 

C-Mirror01
Friday, September 20, 2002
 C-Mirror01 is going to be an outside mirror with a concrete backing.

Making the Mold:
a) Drew pattern out on paper bag.
b) Cut out pattern - inside mirror frame and outside of frame.
c) Traced pattern onto sheet of 1" styrofoam, making sure there was at least 1 1/2" of stryofoam on each side of pattern.
d) Cut outside of pattern with box and kitchen knife from styrofoam.
Note: This cutout piece now serves as the mold.
e) Traced the inside shape of the pattern onto 1/8" styrofoam.
f) Cut out that piece of styrofoam.
Note: This piece will serve to make pattern for mirror. (This will be more understandable later). 


Selected glass and ornaments to apply to C-Mirror01.

C-Mirror01
 Saturday, September 21, 2002

 a)Cut the blue and white glass and flowers down to desired size.
b) Nipped edges of all the cut glass.
(This outside piece should not be subject to much touching; I'm not going to deburr the glass).

 
C-Mirror01
Sunday, September 22, 2002

a) Layed out gem and flowers in approx. placement.
b) Mixed batch of wallpaper paste and put in cool whip container for short term keeping. (Will last a couple of weeks).
c) started applying glass to paper pattern. Nipped pieces, as needed, to conform to space it must fit within. (Note that the pattern, are upcoming color are marked on the pattern).

Note: This is a reverse mosaic technique. The glass is applied to the paper upside down and held in place using wallpaper paste. Later, the paper (with glass attached), will be moved onto bottom board, inside of mold, and mirror, concrete, etc. applied over top .... continue watching if you do not understand).


C-Mirror01 
Monday, September 23, 2002
Completed attaching glass to paper pattern, until completed.

(This is always fun ... even though I'm careful in making sure I get the right color in the right section, I never really know if I've got it right until it's done and I remove the paper).

Set aside to dry. It will probably be several days before I cut mirror and complete concrete process as the weather man says we might be having a hurricane. (Got to get everything ready).

C-Mirror01 & 02 
Saturday, September 28, 2002
C-Mirror01&02 are being worked simultaneously. As such, I'll mix pictures of the two together at this stage, as everything is being done the same.

a) Cut 1/2" piece of styrofoam same size as outside of frame. (Note, there is nothing magical about the 1/2". It just happens I have a couple sheets of this size hanging around). This becomes the bottom piece that will support the mosaic & concrete until the frame is removed.
B) Attached mirror frame to bottom using duct tape. Note that the duct tape goes all the way up the sides of the inside frame. This will keep outside edge of concrete nice.
c) Picked up paper pattern with mosaic and laid into frame. Placed the center 1/8" styrofoam piece, previously cut, in center.
d) Cut Mirror from large piece of sheet mirror.
e) Cut strip pieces of stucco mesh to use as reinforcement for the concrete.

At this point, we are ready to proceed with concrete ..... except the LSU vs. MS game is coming on TV. I'm going to put all this away and move inside and work on something where I can watch the game. (If I open the doors, my studio overlooks the living room, and I have a direct shot at the TV. Aren't you glad I shared that with you.)


C-Mirror01 
Monday, September 30, 2002
a) Put toothpicks in center 1/8" sytrofoam piece to hold in place.
b) Mixed up a bucket of dry cement/grout/sand mixture. Will work with the mixture 1 - 2 cups at a time.
c) Mixed up small amount of cement mix on dry side. Pressed into crevices between glass shards and along inside outside edges of mirror frame.
d) Placed mirror face side down over 1/8" styrofoam piece.
e) Put in another layer of cement mix to bring up even with mirror. 

a) Layed pieces of stucco mesh over pressed concrete to give piece some support. Note that two 'S' hooks are inserted into stucco. These will supply a way to hang mirror when complete.
b) Applied additional layer of cement mix, pressing though stucco mesh.
c) Continued applying layers, pressing and smoothing to ensure no air pockets, until cement level with top of frame.
d) Smoothed again and applied light texture to top (back) with hands.
e) Applied mirror number, date and initials.
f) Wrapped up in plastic. Will let sit until tomorrow afternoon, then will break off mold.

C-Mirror01
Tuesday, October 1, 2002
Removed plastic and made room to work on piece. Lifted and turned over so mirror is now facing up.

a) Broke off styrofoam frame, in small chunks, around outside. Lightly rasped the back edge to remove sharpness.
b) Loosened duct tape from edges, lifted concrete piece and pulled off from bottom.
c) Lifted out 1/8" styrofoam piece that is laying over top of the mirror. (This both protected the mirror, as well as created an 1/8" space between the mirror and top of frame).
d) Sprayed paper pattern covering glass shards with water bottle. Let set for a couple minutes to loosen paper, then pulled paper off.
e) Carefully rasped top edges of outside/inside of frame to remove sharp edge/crease points.
f) Sprayed mirror down with water mist; wrapped back up in plastic and set aside to cure. Top and edges of piece still appear to fragile to handle. 


C-Mirror-01
Friday, October 25, 2002


C-Mirror-01 was created the week of 9/20 and has been curing in the back yard holding area ever since. Pulled out, unwrapped plastic and inspected. The mirror has a haze, but everything else looks good.

Took to back porch and cleaned both the mosiac glass and mirror with a soft cloth and vinegar.

Cut a piece of wire and attached to S-Hooks in back. Hung on fence ... as this piece has a haze on the mirror (not sure why ... will have to research); it is not 'for-sale' quality.

Concrete Mirror 02 - Tutorial

 6/14/2002:  Transferred from my Bellsouth Art Diary.  Apparently I did not finish documenting this piece ... i.e., attaching the coat hooks.   I did attach the coat hooks and hang on the back fence.   Over time, three of the fence hooks fell off.   It could have been easily reattached with a little silicone caulk or mortar; I just didn't.  It still hangs on the back fence.

C-Mirror02
Event Times
Monday, September 23, 2002
 Start another concrete mirror. I have a large sheet of mirror in the shed that came from a neighbors bathroom (they were remodeling and trashed it) that I'd like to use up and get out of the way. Large sheets of mirror are always dangerous to have leaning around.

1) Cut open paper bag and decided on pattern for mirror frame.
2) Measured and drew outline on paperbag.
c) Cut out pattern - inside and outside.
d) Traced inside mirror pattern onto sheet of 1/8" styrofoam and cut out. This is used to apply inside frame pattern on mirror glass.
e) Traced outside pattern onto sheet of 1" styrofoam and cut outside of pattern. (This piece of sytrofoam forms the 1" sides of the mirror frame.
f) Traced outline of hooks onto 1/8" styrofoam and cut out. These outlines will serve as placeholders for the hooks when the concrete is poured. 

C-Mirror02
Event Times
Tuesday, September 24, 2002
 a) Selected glass shards, gems and tile pieces from available inventory.
b) Put coat hook in paint box and spray painted bright yellow. (Note - applied the coats to quickly; coat hooks are soaking in paint thinner; will have to be redone in a couple of days).
C) Cut glass shards down to appropriate sizes and nipped edges to remove sharp points. (I'm not deburring as is for outdoor use).
d) Sorted flower shards to color - pink/green/yellow for ease of use.
e) Cut tile pieces to appropriate size.


C-Mirror02
Event Times
Wednesday, September 25, 2002

 a) Refreshed premade wallpaper paste by adding a little water and remixing (I like to work with in on the dry, not soupy side). Note, all guing of pieces to paper pattern is with wallpaper paste.
b) Glued down styrofoam cutouts for coat hooks.
c) Applied dark blue shards to four corner dividers.
d) Layed out initial design pattern with tiles and gems. Glued in place.


C-Mirror02
Event Times
Thursday, September 26, 2002


 a) Continued applying glass shards to paper pattern.
b) Finished applying shards. This one came to a close call. When done, I had a whole three pieces of the floral pattern left!!.
d) Picked up mess and put away. Set aside mirror form.

(Tropical Storm Isadore came through over the last two days. In preparation, the garage and shed are packed down with all the outside stuff. Tomorrow will still be too wet -- almost 10" of rain in 15 hours --, and Saturday is LSU game, guys are gone. So, point of this dialog is, I can't get to the mirror glass in the shed, or concrete, or anything else I need until Monday. So, this project (as well as C-Mirror01) will just have to wait. 


C-Mirror01 & 02
Event Times
Saturday, September 28, 2002


 C-Mirror01&02 are being worked simultaneously. As such, I'll mix pictures of the two together at this stage, as everything is being done the same.

a) Cut 1/2" piece of styrofoam same size as outside of frame. (Note, there is nothing magical about the 1/2". It just happens I have a couple sheets of this size hanging around). This becomes the bottom piece that will support the mosaic & concrete until the frame is removed.
B) Attached mirror frame to bottom using duct tape. Note that the duct tape goes all the way up the sides of the inside frame. This will keep outside edge of concrete nice.
c) Picked up paper pattern with mosaic and laid into frame. Placed the center 1/8" styrofoam piece, previously cut, in center.
d) Cut Mirror from large piece of sheet mirror.
e) Cut strip pieces of stucco mesh to use as reinforcement for the concrete.

At this point, we are ready to proceed with concrete ..... except the LSU vs. MS game is coming on TV. I'm going to put all this away and move inside and work on something where I can watch the game. (If I open the doors, my studio overlooks the living room, and I have a direct shot at the TV. Aren't you glad I shared that with you.)


C-Mirror02
Event Times
Monday, September 30, 2002

 Cement mix: 3 parts grout; 3 parts sifted sand; 1 part portland cement. Mix moistened and used 1 - 3 cups at a time.

a) Pressed mix (on dry side) into spaces between glass shards and mirror edges.
b) Set mirror in place, face side down, over top of 1/8" styrofoam middle insert.
c) Applied another layer to cement to bring level with mirror.
d) Laid in pieces of stucco mesh in middle and along sides, over top of existing cement mixture. (This is reinforcement for the concrete. Note that two "s" hooks are inserted to the mesh to act as hooks for wire hanging.
e) Pressed another layer of cement through the stucco mesh.
f) Continued applying layers of cement mix until level with top of frame.
g) Smoothed out with hands to form a light texture on back.
h) Stencilled in Mirror number, date and initials.
i) Wrapped in plastic. Will hold and release from mold tomorrow afternoon. 


C-Mirror02
Event Times
Monday, September 30, 2002

I did a lousy job painting these coat hooks yellow, last week. Obviously, I applied the paint to thick ... they looked real sorry.

So .... laid out the coat hooks on plastic and applied paint stripper. Allowed to sit 10 minutes, then wiped off paint/stripper with paper towels. Cleaned with water and dried thoroughly.
Put in paint box (old wooden wine box) and applied a light coat of pink paint. 


C-Mirror02
Event Times
Tuesday, October 1, 2002

 a) Removed plastic wrap from piece and turned over so mirror side is facing up.
b) Gently broke off pieces of outside styrofoam frame.
c) Loosed duct tape from outside edges, lifted piece and pulled from bottom.
c) Rasped outside edges to remove sharp and/or uneven areas.
d) Removed 1/8" styrofoam piece the is over the mirror.
e) Sprayed paper with light mist of water and waited a couple minutes for the moisture to loosen the glue. Pulled off the paper.
f) Removed the small sytrofoam inserts that are the placeholders for the coat hooks.
g) Sprayed piece with water and re-wrapped in plastic.
h) Moved to holding section to allow mirror to cure for a few more days before handling further. 


CMirror-02
Event Times
Friday, October 25, 2002


Pulled CMirror-02 from curing section in back yard where it has been wrapped up in plastic the last three weeks. Removed plastic and inspected. Overall, looks pretty good.

a) Moved into shed.
b) Mixed about 5 tablespoons of cement/grout/sand mix. (I had previously set some aside from the same mix that was used for the mirror in a plastic bag to complete this project.
c) Filled the hole spaces that had been made by the styrofoam forms for the coat hooks.
d) Set the coat hooks in place.
e) Cleaned up cement mix that oozed out the sides with a toothpick.
f) Let set for about 30 minutes, then cleaned mosaic glass and mirror using soft cloths with vinegar.

Set aside to consider next steps, or if it is complete .... except for sealing.

October 13, 2002

Bowling Ball Holder

6/21/2010:  This entry transferred from my Bellsouth Art Diary.  This piece was meant to be a sculptural holder for a future mosaic bowling ball. It definitely did not go as planned, and at the end of the sculpting process, one of the arms broke in half.   I threw it away; an experiment / project gone wrong. 

BB Holder
Tuesday, October 8, 2002
Horray -- computer is fixed (again). We seem to suffer alot of software issues, and, as a result, this computer makes frequent (overnight) trips to the PC doctor.

Anyway .....
Started the BB holder (Bowling Ball, that is) this morning.

a) Cut 3 pieces of stucco mesh at 27" by 5".
b) Shaped each piece into a circle, to form a tube.

Then ... had to quit to go pick up the PC. Beau has an outside appointment tomorrow, so will not be able to continue until Thursday.  


BB Holder
Thursday, October 10, 2002

Bowling Ball Stand cont.

a) Cut cirle out of a piece of styrofoam to serve as the base.
b) Cut a piece of stucco mesh to fit inside the circle.
c) Set circle on top of another piece of styrofoam, to serve as bottom.
d) Mixed up small batch of cement mix (grout/sifted sand/portland cement).
e) Formed small patties, and pushed into bottom of circle.
f) Applied stucco mesh over the concrete.
g) Shaped the three legs and placed on top of the mesh, filling in with additional concrete mix until reach top of circle

Stopped for 4 hours to allow to harden.

h) Mixed another small batch of concrete mix and filled in each leg up several inches.
i) Set aside to dry overnight.

Note: Picture actually taken next morning; batteries were dead while piece went through these processes.


BB Holder
Friday, October 11, 2002


Okay, so some things don't go anywhere near the plan !!!!

a) Mixed small amount of concrete mix and continued pressing into legs of stand.

I should have stopped about three 3/4 of way up .... but, NO ... had to keep going.

And then, legs started leaning this way and that way and all kinds of ways ... even though I had tied them together at the top, until I said to heck with it .... This one is garbage .... and untied the wire and let them go.

Down the legs fell, bending perfectly where yesterday's concrete had dried.
So, after a couple minutes contemplation, started moving the legs around, propping them up and whatever.

So, here we are ... perhaps the first piece of sculpture! Will continue on second layer tomorrow ... or sometime soon.

I just have to chuckle everytime I look this.


BB Holder
Saturday, October 12, 2002

 a) Applied cement mix (grout/sifted sand/portland cement) to the two outside legs (not sure what I want to call them know)
b) Smoothed with hands, adding or subtracing cement as needed for a smooth and uniform appearance.
c) Set aside to dry overnight. Tomorrow, I'll complete the middle leg. As the legs are so close together, I was concerned I would bump the outside legs and knock off the applied cement. Tomorrow, that cement will be dry and dumping will not represent the same risk. 


BB Holder
Sunday, October 13, 2002


 Applied thin layer of cement mix to middle leg of BB Holder. This was a tight fit. Two different places almost touch. Had to insert a small piece of styrofoam at bottom to separate back part enough to work in between. When completed, there is < 1/16" in back separation, and not too much more in the front.

Set aside to dry. Tomorrow, will smooth off the pedestal and apply a thin layer of cement mix to 'pretty' it up a bit. 

October 12, 2002

Yard Sale Saturday, 10-12-2002

Yard Sale Saturday
Saturday, October 12, 2002

Visited 8 yard sales this morning and found nary a thing I thought would come in handy. I did find, however, some good Oak Leaves on a tree in the middle gound over on Marigny. Of course, I cut off a few and brought them home.

I'm going to have to get on with all these leaves I'm collecting. I have the sink in the garage almost full of water trying to preserve them all !
 

October 07, 2002

Paint Leaf Castings

 6/20/2010:  Transferred this entry from my Personal Art Calender (Bellsouth).  These pieces still hang on our shed.   They held up remarkably well; including the paint finish.  

Paint Leaf Castings
Monday, October 7, 2002


A month back I created about a dozen leaf castings. Of these, 8 made it through with no cracks. I'm ready to being process of experimenting with paint techniques.

a) Washed up concrete leaves well, removing remaining leaf structure. (Amazingly enough, a couple of these still had the leaf intact, and leaf was still partially green!).
b) Let dry for several hours.
c) After dinner, set up paints. Applied one coat of watered down acrylic white paint to front and back.
d) Applied one coat of watered down green (two different shades; 4 leaves ea) acrylic paint.
e) Left to dry overnight. 

Paint Leaf Castings
Tuesday, October 8, 2002


Painted each of the leaves, using multiple colors and trying several different techniques.

Left to dry overnight. 


Paint Leaf Castings
Thursday, October 10, 2002

Moved leaves to table on back porch and set on several layers of newspaper. Applied two coats of sealer (Amor-All brand) to each side over the course of four hours.

No pictures today .... camera batteries are recharging.


October 05, 2002

Yard Sale Saturday, 10-5-2002


Broke out of my typical yardsale route today and went to the neighborhood sale at Crestwood Estates. All the way to Covington!!.

A couple finds .... a glass cylinder, a picture frame, 10 brass knobs and a few 'huge' gems. Also ... not pictured is a wig head and a bowling ball. All purchased for future projects.

Called it quits early. Mass people, and their driving around on 'to narrow' streets drives me crazy. When I found myself confronting one 'should'nt have been given a drivers license' person, decided it was time to go home. (Being hostile or vindictive reminds me of my mother, and I definitely don't want to go there !!!).

Came home.

September 29, 2002

Spring Jewel Mosaic Picture Frame

  6/9/2010:  This entry was downloaded from my Art Diary on the Bellsouth Personal Web Pages.    After completing, this picture frame was tucked away until 9/2008.  When Lilly was born, I put a picture of her and her momma in it and presented it to Nikki.    She keeps it on her bookcase.


Event Times
Tuesday, September 3, 2002


Selected next project .... a small picture frame that was picked up at a yard sale two weekends ago. (Need something small after spending so much time on the entry table).

Removed glass, picture & backing from frame. Sanded lightly with hand sander. Selected glass, a couple pairs of contrasting earrings and some bangle type thingies.

Painted back and side edges with three coats of gold acrylic paint. As glass selected is already cut, will begin process of nipping and deburring.

Event Times
Wednesday, September 4, 2002


Finished nipping/deburring. Started applying tesserae and jewelry to picture frame.  

Finished applying Tessarae to frame. Set aside to dry for several hours, and then cleaned with a damp cloth. (Usually lay a damp cloth over piece and allow moisture to loosen any mastic, then wipe off gently with a cloth. You have to be careful as it takes a couple days for mastic to firmly dry.

 Signed piece as 'Spring Jewel' (primary name of china used), signed and dated.

Applied three coats of PolyAcrylic to back and outside/inside edges.

Hold for next grouting session.


Event Times
Saturday, September 28, 2002


Grouting picture frame.
a) Mixed small amount of white grout (on dry side) in mardis gras cup. Added small amount of lavender paint to tint grout. Mixed well.
b) Applied grout to mirror frame with hands; pushing between spaces and around edges of jewelry and beads.
c) Remove grout with small sponge, rinsing sponge between each swipe of the frame. Goal is to remove grout from tops of glass and jewels, but not from between cracks.
d) Keep working at removing grout until everything clean. Having jewelry on a piece always makes grouting more difficult. Invariably, grout gets into little spaces on the jewels and is quite difficult to get out. (This typically comes down to coaxing out with a toothpick).

Will set aside for a hour or two and then buff a couple times to remove any haze that develops on the glass.

This piece is named Spring Jewel. Tomorrow, or Monday if we go to the Wooden Boat Festival, I'll seal and then we can put together and finish.


Event Times
Sunday, September 29, 2002


Applied two heavy coats of "Impregnator", a sealer, to the picture frame. Waited 10 minutes, then wiped excess liquid from glass so it does not form liquid spots.

This piece is named Spring Jewel (after the primary glass used). It will be posted in the 'not for sale' section of the Mosaic Gallery. This piece will be a gift.
  

Rose Mosaic Water Pitcher; Work in Progress

6/11/2010:   The details of this project are uploaded from my Bellsouth Personal Web Pages.  After completion of this project, the vase was packed into a box and put into a closet for consideration, where it stayed (along with alot of other items), for about 7 years.   Several months back, I decided it was time to start going through these items.   This particular pitcher vase is listed for sale in my Artfire shop under Shabby Chic Rose Floral Pitcher. 

 Water Pitcher
Saturday, September 7, 2002
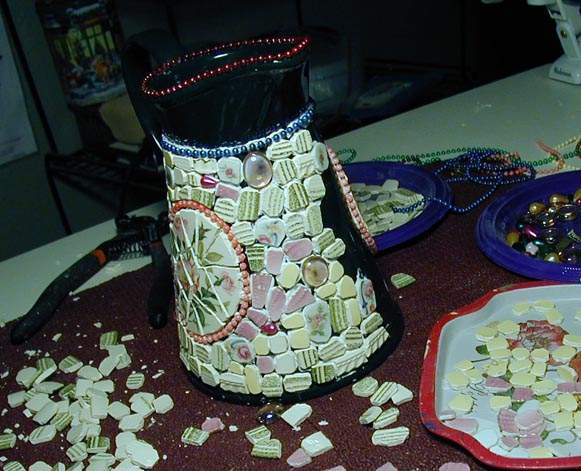
 Selected saucers, beads, watch and ceramic flowers to adorn the green water pitcher (vase.

It's interesting that just about everything here was found at today's yard sales. That seldom happens, however, when I had it all laid out on the table to take a look, realized it. So, this one just has to be a go. 


Water Pitcher
Sunday, September 8, 2002
Took right about three hours ... here's everything all chipped, nipped,deburred and ready to roll !!! 
Have a little extra time today (Beau's wrapped up in the Saint's football game), so went ahead and started applying the tessarae. 

Water Pitcher
Monday, September 9, 2002
Continued applying tessarae to the water pitcher. Now almost 1/2 done. 

Water Pitcher
Wednesday, September 11, 2002

Finished applying tessarae to water pitcher. Will set aside for a couple of days to allow mastic to thoroughly dry and then will clean and hold for grouting.

Water Pitcher
Saturday, September 28, 2002
Okay, this is the last item to grout for September project. Horay!!

a) Mixed approx. 1 cup of white grout in a mardis gras cup (because they are disposable).
b) Applied to water pitcher with hands, pushing grout between crevices in glass, gems and jewels. Note that by the time I am finished with applying grout to entire pitcher, the grout is already mostly dry.
d) With 'barely' damp sponge, brushed dry grout from top of glass.
e) Continued removing grout in layers until water pither is clean.

I did not like the way the beads at the top of the vase looked when grout was applied .... so, pulled them off and cleaned rim.

Will let sit until after dinner, then will buff with soft clean cloth to remove any haze build up.


Water Pitcher
Sunday, September 29, 2002
 Applied two heavy coats of Impregnator (stainl sealer) to the water pitcher to seal grout. Waited approx. 10 minutes and wiped off any remaining liquid from the glass and gems. (Impregnator is a clear liquid, like water, but with a tremendous smell. If left on the glass to completely dry, it will leave tremendous water spots).

This project is completed. Sometime in the next day, I'll come up with a name for her (usually this happens well before now) and take pictures. 

September 28, 2002

Provence China : Mosaic Entry Way Table

6/3/2010 :  This piece is uploaded from my Art Diary maintained on the Bell South Personal Web pages between 2002 and 2006.   I never offered this table for sale.   I ended up using in it my front entry for a couple years, and now it's on a back wall.    I actually no longer want it, just haven't been motivated yet to move it out to a new home.

*************************************************************************************


August 20, 2002

Selected table for next 'inside' project. Table purchased several weeks ago at a yard sale. It has a shelf that sits underneath main table that will be repaired.

Beau (being the great sport that he is), took table apart and sanded for me. 


August 21, 2002

Started breaking dishes for mosaic on entry table. Selected set of dishes named 'Provence' from previous yardsale. Set consists of 8 plates; 8 saucers; 7 bowls and 8 coffee cups.

Glass is being broken with tile cutters, versus breaking with hammer, to maintain control of keeping pattern and finished tile size under control.

It took approx. 3 1/2 hours to cut the glass to desired sizes. 


August 22, 2002
Selected a shade of green for table legs, sides and bottoms. Painted two on an surfaces not to receive mosaic, spaced several hours apart.

 August 23, 2002
Continued process glass. Started nipping the corners off all of the pieces of cut 'glass' tile. This will give a uniformity of appearance and remove the sharp corners. Due to amount of glass involved, this will take 4 - 5 hours.

August 24, 2002
Apply 2 coats high gloss varnish to all painted (non-mosaic) surfaces. This step will be completed over several days ... it takes about 8 hours for each coat to dry ... legs are painted seperately on each side.

Note that Varnish is much more difficult and time consuming (not to mention the smell) than poly acrylic, but the result (in my opinion) just can't be beat.


August 26, 2002
Scored table with box knife and started mosaic on bottom shelf. Mosaic being applied to table with tile mastic.
 August 28, 2002
Finished second shelf to the Entry Table. Set aside to dry.

August 29, 2002
Mosaic to table top in progress. Deciding whether to process coffee cups for side panels, use existing "left-over" glass from top, or paint. 

August 30, 2002
Pulled the 7 coffee cups that match the plate set from inventory. Cut cuts down to maintain pattern. Unfortunately, this glass was rather fragile and I was not able to save the handles. 

August 31, 2002
Applied coffee cup pieces to edges of entry table. Each piece is trimmed with nippers and deburred with a hand file at point of application. The tessarae is applied with mastic, as was the top.

After application complete, table will be set aside overnight, then thoroughly cleaned to remove any mastic on tile. Table will then rest at least a week, before grouting. 


September 27, 2002
a) Mixed grout. Started with plain white and tinted with small amount of acrylic paint (same color as legs), in an old butter container.
b) Applied grout to table (top & sides, as well as bottom shelf), pressing between cracks and crevices with hands until complete.
c) Scrapped top of table with plastic butter knife to pull off excess grout on top of glass shards (easier to wiping it all off with the sponge).
d) Removed remaining grout with damp sponge, rinsing sponge after each wipe.
e) Allowed table tops to dry for about an hour, then buffed glass shards with soft clean/dry cloth to remove built up haze from grout.


 September 28, 2002
Applied two heavy coats of Impregnator, a stain and water sealer to table tops and sides to protect finish. Allowed sealer to soak in for ten minutes, then wiped remaining liquid from tops of glass. (Let this stuff dry on the glass and it's pretty tough to get off).

Later tonight the glass on the tables will be cleaned with vinegar and buffed to bring to ultimate shine. Tomorrow, or Monday, I'll attach the legs and photograph.

This piece is named Provence and will be made available for sale in the Mosaic Gallery.